Android 之 View 绘制流程
Android 之 View 绘制流程
记忆点:
Android 界面是怎么显示的? -> setContentView()涉及到 LayoutInflater -> View 的绘制流程
setContentView 与 LayoutInflater
getWindow().setContentView()
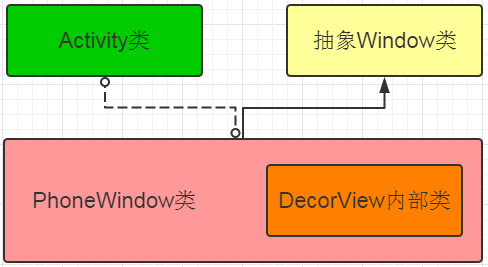
Activity 中有一个成员为 Window, 其实例化对象为 PhoneWindow, PhoneWindow 为抽象类 Window 的实现类:
- Window 是一个抽象类,提供了绘制窗口的一组通用 API
- PhoneWindow 是 Window 的具体继承实现类,而且该类内部包含了一个 DecorView 对象,该 DecorView 对象是所有应用窗口(Activity 界面)的根 View
- DecorView 是 PhoneWindow 的内部类,是 FrameLayout 的子类,是所有应用窗口的根 View
窗口 PhoneWindow 的setContentView()
Activity 中三个重载的setContentView():setContentView(int layoutResID)、setContentView(View view)、setContentView(View view, ViewGroup.LayoutParams params)1
2
3
4
5
6
7
8
9
10
11
12
13
14
15
16
17
18
19
20
21public voids setContentView(int layoutResID){
if(nContentParent == null){
// 是否是第一次调用
installDecor();
}else if (!hasFeature(FEATURE_CONTENT_TRANSITIONS)) {
// 默认为 false
mContentParent.removeAllViews();
}
if(hasFeature(FEATURE_CONTENT_TRANSITIONS)){
final Scene newScene = Scene.getSceneForLayout(mContentParent, layoutResID, getContext());
transitionTo(newScene);
}else {
// mLayoutInflater 是在 PhoneWindow 的构造函数中得到实力对象的 LayoutInflater.from(context);
mLayoutInflater.inflate(layoutResID, mContentParent);
}
final Callback cb = getCallback();
if(cb != null && !isDestroy()){
cb.onContentChanged();
}
}
1 | public void setContentView(View view, ViewGroup.LayoutParams params){ |
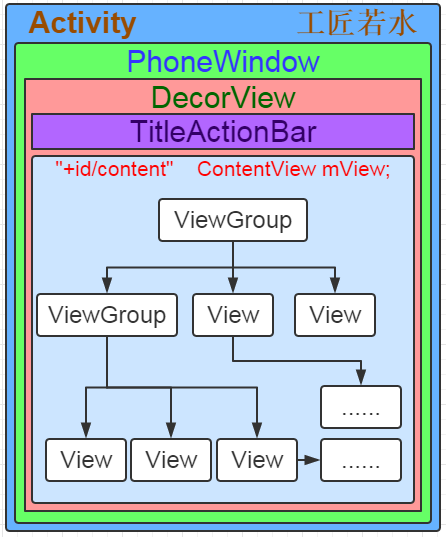
setContentView(View view)内部也是调用setContentView(View, ViewGroup.LayoutParams params),只是 LayoutParams 设置为了 MATCH_PARENT 而已。在程序中可多次调用setContentView(),因为会removeAllViews();流程可概括为:
- 创建一个 DecorView 的对象 mDecor,该对象作为整个应用窗口的根视图。
- 根据 Feature 等 style theme 创建不同的窗口修饰布局文件,并通过
findViewById()获取 Activity 布局文件存放的地方(窗口修饰布局文件 id 为 content 的 FrameLayout 内)。
当启动 Activity 掉运完 ActivityThread 的main()方法之后,接着调用 ActivityThread 类的performLaunchActivity()来创建需要启动的 Activity 组件,在创建 Activity 组件的过程中,还会为该 Activity 组件创建窗口对象和视图对象,接着 Activity 组件创建完成后,通过调用 ActivityThread 的hadnleResumeActivity()将它激活,在方法中r.activity.makeVisible()显示我们上面setContentView()创建的 mDecor 视图族。
LayoutInflater 机制原理
获取 LayoutInflater 实例的两种写法:1
2LayoutInflater lif = LayoutInflater.from(context);//其实就是对下面方式的封装
LayoutInflater lif = context.getSystemService(Context.LAYOUT_INFLATER_SERVICE);
layoutInflater.inflate()1
2
3public View inflate (int resource, ViewGroup root){
return inflate(resource, root, root != null);
}
layoutInflater.inflate(resource, root)->layoutInflater.inflate(resource, root, true/false)1
2
3
4
5
6
7
8
9
10
11public View inflate(int resource, ViewGroup root, boolean attachToRoot){
final Resources res = getContext().getResources();
...
//Android 默认实现为 Pull 解析的实现类 XmlPullParser
final XmlResourceParser parser = res.getLayout(resource);
try {
return inflate(parser, root, attachToRoot);
} finally {
parser.close();
}
}
layoutInflater.inflate(resource, root)->layoutInflater.inflate(resource, root, attachToRoot)->inflate(XmlPullParser parser, ViewGroup root, boolean attachToRoot)1
2
3
4
5
6
7
8
9
10
11
12
13
14
15
16
17
18
19
20
21
22
23
24
25
26
27
28
29
30
31
32
33
34
35
36
37
38
39
40
41
42
43
44
45
46
47
48
49
50
51
52
53
54
55
56public View inflate(XmlPullParser parser, ViewGroup root, boolean attachToRoot){
synchronized(mContructorArgs){
Trace.tarceBegin(Trace.TRACE_TAG_VIEW, "inflate");
final AttributeSet attrs = Xml.asAttributeSet(parser);
Context lastContext = (Context)mContructorArgs[0];
mContructorArgs[0] = mContext;
View result = root;
try {
int type;
// 找根节点
while((type = parser.next) != XmlPullParser.START_TAG && type != XmlPullParser.END_DOCUMENT){
// empty
}
// 如果
if(type != XmlPullParser.START_TAG){
throw new InflateException(parser.getPositionDescription() + ": No start tag found!")
}
final String name = parser.getname();
if(TAG_MERGE.equals(name)){
if(root == null || !attachToRoot){
throw new InflateException("merge can be used only with a valid ViewGroup root and attach = true");
}
rInflate(parser, root, attrs);
}else {
// 方法内部又会去调用 createView()
// 然后使用反射的方式创建出 View 的实例并返回
View temp = createViewFromTag(name, attrs);
ViewGroup.LayoutParams params = null;
if(root != null){
params = root.generateLayoutParams(attrs);
if(!attachToRoot){
temp.setLayoutParams(params)
}
}
rInflate(parser, temp, attrs);
if(root != null && attachToRoot){
root.addView(temp, params);
}
if(root == null || !attachToRoot){
result = temp;
}
}
}catch(XmlPullParserException e){
InflateException ex = new InflateException(e.getMessage());
ex.initCause(e);
throw ex;
}catch(IOException e){
InflateException ex = new InflateException(parser.getPositionDescription() + ": " + e.getMessage());
ex.initCause(e);
throw ex;
}
return result
}
}
LayoutInflater 使用的是 Android 提供的 pull 解析方式来解析 xml 布局文件的。以上只是创建了一个根布局实例而已,接下来会调用rInflate()方法来循环遍历这个根布局下的子元素。其中获取 View 的方法是createViewFromTag(),通过反射的方式。1
2
3
4
5
6
7
8
9
10
11
12
13
14
15
16
17
18
19
20
21
22
23
24
25
26
27private void rInflate(XmlPullParser parser, View parent, final AttributeSet attrs){
final int depth = parser.getDepth();
int type;
while(()(type = parser.next()) != XmlPullParser.END_TAG || parser.getDepth() > depth) && type != XmlPullParser.END_DOCUMENT){
if(type != XmlPullParser.START_TAG){
continue;
}
final String name = parser.getName();
if(TAG_REQUEST_FOCUS.equals(name)){
parseRequestFocus(parser, parent);
}else if(TAG_INCLUDE.equals(name)){
if(parser.getDepth() == 0){
throw new InflateException("<include /> cannot be the root element");
}
parseInclude(parser, parent, attrs);
}else if(TAG_MERGE.equals(name)){
throw new InflateException("<merge /> must be the root element");
}else{
final View view = createViewFromTag(name, attrs);
final ViewGroup viewGroup = (ViewGroup) parent;
final ViewGruop.LayoutParams params = viewGroup.generateLayoutParams(attrs);
rInflate(parser, view, attrs);
viewGroup.addView(view, params);
}
}
parent.onFinishInflate();
}
由上可以看出,布局嵌套过深不仅效率低还可能引起调运栈溢出。同时在解析 tag 时也有一些特殊处理(include\merge)。布局优化可以通过 hierarchyviewer 来查看,通过 Lint 也可以自动检查出来一些。关于布局优化
setContentView()整个过程主要是如何把 Activity 的布局文件或者 Java 的 View 添加至窗口:
- 创建一个 DecorView 的对象 mDecor,该对象作为整个应用窗口的根视图;
- 依据 Feature 等 style theme 创建不同的窗口修饰布局文件,并通过 findViewById 获取 Activity 布局文件该存放的地方(窗口修饰布局文件中 id 为 content 的 FrameLayout);
- 将 Activity 的布局文件添加到 id 为 content 的 FrameLayout 内;
- 当
setContentView()设置显示为 OK 以后会回调 Activity 的onContentChanged()。Activity 的各种 View 的findViewById()方法等都可以放到该方法中,系统会帮忙回调。
View 绘制流程与源码分析:
每一个 View 绘制都经历三个最主要的过程:measure -> layout -> draw
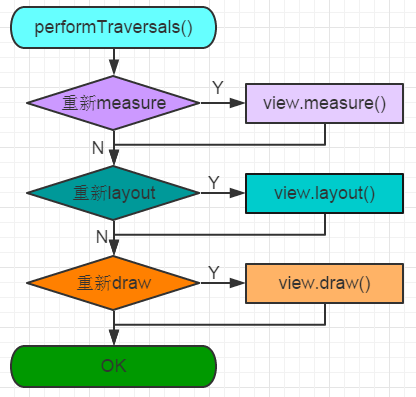
整个 View 树的绘图流程是在 ViewRootImpl 类的performTraversals()开始的。该函数功能主要是根据之前设置的状态,判断是否重新计算视图的大小measure,是否重新安放视图位置layout,以及是否重绘draw。1
2
3
4
5
6
7
8
9
10
11
12private void performTraversals(){
...
// lp.width 和 lp.height 在创建 ViewGroup 实例的时候就被赋值了,都等于 MATCH_PARENT
int childWidthMeasureSpec = getRootMeasureSpec(mWidth, lp.width);
int childHeightMeasureSpec = getRootMeasureSpec(mHeight, lp.height);
...
mView.measure(childWidthMeasureSpec, childHeightMeasureSpec);
...
mView.layout(0, 0, mView.getMeasuredWidth(), mView.getMeasuredHeight());
...
mView.draw(canvas);
}
1 | /** |
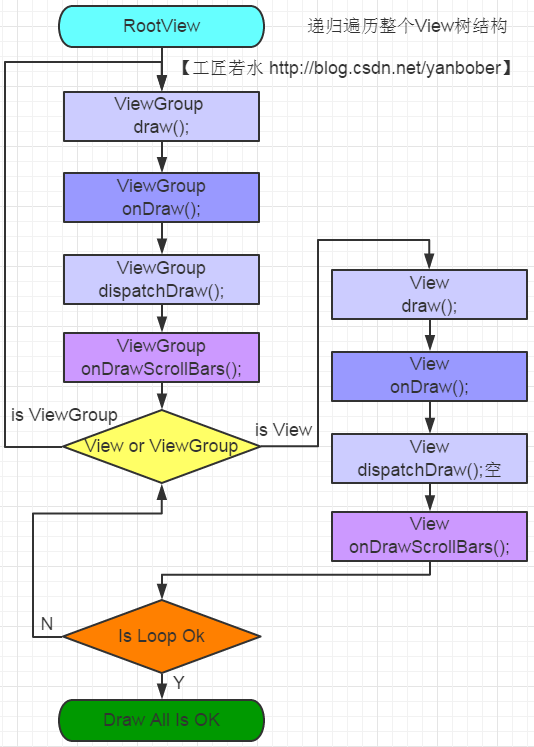
其中 mView 就是 View 对象。以下就是整个流程的大致流程图:
View 绘制第一步measure
View 的measure()1
2
3
4
5public final void measure(int widthMeasureSpec, int heightMeasureSpec){
...
onMeasure(widthMeasureSpec, heightMeasureSpec);
...
}
为整个 View 树设置实际的阿晓,然后设置实际的高和宽,每个 View 控件的实际宽高都是由父视图和自身决定的。measure()不可被重写,实际的测量是在onMeasure()中进行。
关于 widthMeasureSpec/heightMeasureSpec,这两个参数是从父 View 传递过来,代表了父 View 的规格。
MeasureSpec: 32位,也就是 specMode + specSize,高2位表示 MODE,低30位表示 size (也就是父 View 的大小)
MeasureSpec.EXACTLY:表示父视图希望子视图的大小应该是由 specSize 的值来决定的,系统会默认按照这个规则来设置子视图的大小,开发人员也可按照自己的意愿设置成任意大小。
MeasureSpec.AT_MOST:表示子视图最多只能是 specSize 中指定的大小,开发人员应该尽可能小的去设置这个视图,并且保证不会超过 specSize。系统会默认按照这个规则来设置子视图大小,开发人员也可以按照自己的意愿设置成任意大小。
MeasureSpec.UNSPECIFIED:表示开发人员可以将视图按照自己的意愿设置成任意的大小,没有任何限制。这种情况比较少见,不太会用到。
measure()->onMeasure()
1 | protected void onMeasure(int widthMeasureSpec, int heightMeasureSpec){ |
onMeasure()是真正去测量并设置 View 大小的地方,默认会调用getDefaultSize()方法来获取视图的大小。1
2
3
4
5
6
7
8
9
10
11
12
13
14
15public static int getDefaultSize(int size, int measureSpec){
int result = size;
int specMode = MeasureSpec.getMode(measureSpec);
int specSize = MeasureSpec.getSize(measureSpec);
switch(specMode){
case MeasureSpec.UNSPECIFIED:
result = size;
break;
case MeasureSpec.AT_MOST:
case MeasureSpec.EXACTLY:
result = specSize;
break;
}
return result;
}
这里传入的 measureSpec 是一直measure()中传递过来的。系统这时默认行为是如果传递过来的 specMode 是 AT_MOST 或是 EXACTLY 就返回 specSize。之后通过setMeasuredDimension()来设定测量出的大小,这样一次measure过程就结束了。而一个布局中一般都会包含多个子视图,每个视图都需要一次measure的过程。在 ViewGroup 中定义了measureChild()、measureChildren()、measureChildWithMargins()方法来对子视图进行测量。measureChildren()内部实质只是循环调用了measureChild(),measureChild()和measureChildWithMargins()的区别只是是否把 margin 和 padding 也作为子视图的大小。1
2
3
4
5
6
7
8
9
10protected void measureChildren(int widthMeasureSpec, int heightMeasureSpec){
final int size = mChildrenCount;
final View[] children = mChildren;
for(int i=0; i<size; ++i){
final View child = children[i];
if((child.mViewFlags & VISIBILITY) != GONE){
measureChild(child, widthMeasureSpec, heightMeasureSpec);
}
}
}
1 | protected void measureChild(View child, int parentWidthMeasureSpec, int parentHeightMeasureSpec){ |
getChildMeasureSpec()去计算子视图的 MeasureSpec,计算的依据是布局文件中定义的 MATCH_PARENT、WRAP_CONTENT 等值。然后再调用子视图的measure(),并把计算出的 MeasureSpec 传递进去,之后的流程与前面介绍的相同。
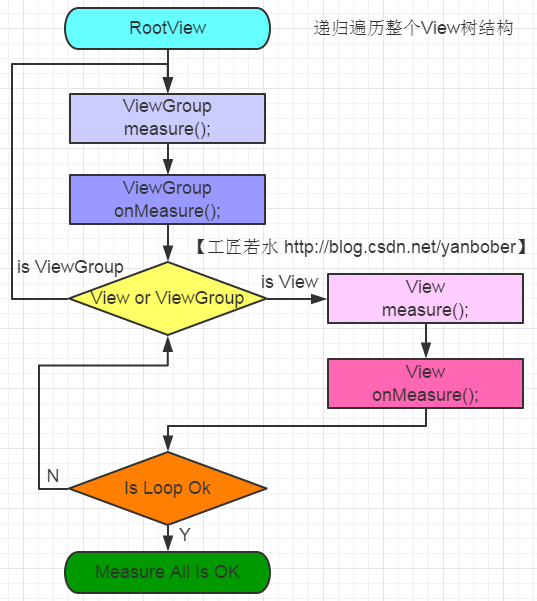
measure() 原理总结
从顶层父 View 向子 View 递归调用view.measure()(measure()中又回调onMeasure())
- MeasureSpec:EXACTLY、AT_MOST、UNSPECIFIED
- View 的
measure()是 final 的,不允许重写,View 子类只能重写onMeasure()来完成自己的测量逻辑 - 顶层 DecorView 测量时的 MeasureSpec 是由 ViewRootImpl 中的
getRootMeasureSpec()方法确定的(LayoutParams 宽高参数均为 MATCH_PARENT,specMode 是 EXACTLY,specSize 为物理屏幕的大小)。 - 使用 View 的
getMeasuredWidth()和getMeasuredHeight()方法来获取 View 测量的宽高,必须保证这两个方法在onMeasure()流程之后被调用才能返回有效值。
View 绘制第二步layout
当 ViewRootImpl 的performTraversals中的measure()执行完成以后会接着执行mView.layout()
1 | private void performTraversal(){ |
layout()接收的四个参数,分别代表着左、上、右、下的坐标,这个坐标是相对于当前视图的父视图而言的
整个 View 树的layout()递归流程:

layout 也是递归结构,ViewGroup 的layout()实际还是调用的 View 父类的layout()方法
1 | public void layout(int l, int t, int r, int b){ |
1 |
|
ViewGroup 中的onLayout()竟然是一个抽象方法,这就意味着所有 ViewGroup 的子类都必须重写这个方法,在内部按照自己的规则对子视图进行布局。以 LinearLayout 为例子:
1 | public class LinearLayout extends ViewGroup{ |
1 | void layoutVertical(int left, int top, int right, int bottom){ |
以上可以看到,一般情况下layout()过程会参考measure()过程中计算得到的 mMeasuredWidth 和 mMeasuredHeight 来安排子 View 在父 View 中显示的位置,但这不是必须的,measure()过程得到的结果可能完全没有实际用处。
layout()原理总结
- View 的
layout()方法可被重写,但是 ViewGroup 的layout()为 final,ViewGroup 的onLayout()为 abstract 的,子类必须重写实现自己的布局逻辑 measure()操作后得到的是每个 View 经过测量过的 measuredWidth 和 measuredHeight,layout()操作之后得到的是对每个 View 进行位置分配后的 mLeft、mTop、mRight、mBottom,这些都是相对父 View 来说的- 凡是 layout_XXX 的布局属性基本都是针对的是包含子 View 的 ViewGroup 的。为一个没有父容器设置相关的 layout_XXX 属性是没有任何意义的
- 使用 View 的
getWith()和getHeight()方法来获取 View 测量的宽高,必须保证这两个方法在onLayout()流程之后被调用才能返回有效值
View 绘制第三步draw
draw()过程也是在 ViewRootImpl 的performTraversals()内部调用的,其调用顺序在measure()和layout()之后。
1 | private void performTraversals(){ |
View 递归 draw 流程:
1 | public void draw(Canvas canvas){ |
第一步,对 View 的背景进行绘制
1 | private void drawBackground(Canvas canvas){ |
第三步,对 View 的内容进行绘制(第二、第五步可以跳过)
1 | protected void onDraw(Canvas canvas){} |
空方法。这是因为每个 View 的内容部分是各不相同,需要具体子类实现具体逻辑
第四步,对 View 的所有子 View 进行绘制
1 | protected void dispatchDraw(Canvas canvas){} |
也是一个空方法。如果 View 包含子 View 需要重写它,看看 ViewGroup 的dispatchDraw()
1 |
|
ViewGroup 确实重写了 View 的dispatchDraw(),该方法内部会遍历每个子 View,然后调用drawChild()
1 | protected boolean drawChild(Canvas canvas, View child, long drawingTime){ |
drawChild()调用了子 View 的draw()。ViewGroup 类已经为我们重写了dispatchDraw()的功能实现,一般不需要重写该方法,但可以重写父类函数实现具体的功能
第六步,对 View 的滚动条进行绘制
onDrawScrollBars(canvas);
draw()原理总结:
- 如果该 View 是一个 ViewGroup,则需递归绘制其包含的所有子 View
- View 默认不会绘制任何内容,真正的绘制都需要在子类中实现
- View 的绘制是借助
onDraw()方法传入 Canvas 类进行的 - 默认情况下的子 View 的 ViewGroup.drawChld 的绘制顺序和子 View 被添加的顺序一致,但是你可以重写
ViewGroup.getChildDrawingOrder()方法提供不同的顺序。
视图状态和视图重绘
视图状态
常见几个:enabled(是否可用,不可用无法响应onTouch事件)、focused、window_focused、selected、pressed…
视图重绘
调用setVisibility()、setEnabled()、setSelected()等方法时都会导致视图重绘,而如果想要手动强制让视图进行重绘,可用通过调用invalidate()来实现。其实上述方法内部也是调用此方法实现重绘。各种重载的invalidate()最终调用的都是invalidateInternal()
1 | void invalidateInternal(int l, int t, int r, int b, boolean invalidateCache, boolean full Invalidate){ |
这是一个向上级父 View 回溯的过程,每一层的父 View 都将自己的显示区域与传入的刷新的 Rect 做交集。看看 ViewGroup 的 invalidateChild 方法:
1 | public final void invalidateChild(View child, final Rect dirty){ |
以上过程最后传递到 ViewRootImpl 的invalidateChildInParent()方法结束
1 |
|
postInvalidate()
实际就是子线程通过 ViewRootImpl 类的dispatchInvalidateDelayed(),通过 Handler 发送 MSG_INVALIDATE 消息,ViewRootImpl 中的 Handler 收到消息就又在 UI 线程中调用了 View 的invalidate()方法。
其他
setContentView()的addView()会通过invalidate(true)触发 ViewRootImpl 类的`performTraversals()
requestLayout()层层上传到 ViewRootImpl 后触发 ViewRootImpl 中的requestLayout()中的scheduleTraversals()。requestLayout()会调用measure()过程和layout()过程,但不会调用draw(),也不会重绘任何子 View包括调用者自身。
参考引用
Android LayoutInflater原理分析,带你一步步深入了解View(一)